
Siding Service vs. Roof Waterproofing: How Both Protect Your Building Envelope
Many building owners treat siding service and roof waterproofing as separate line items, then discover leaks and rot where those systems meet. This article lays out the distinct roles each plays in water, air, and thermal control, shows the roof-to-wall details that usually fail, and explains how to prioritize interventions when budgets are tight. You will get a practical inspection checklist, realistic life-cycle and cost comparisons, and a decision framework you can hand to contractors or use in procurement.
How the building envelope depends on coordinated water and air control
Core point: building envelope success is a matter of continuity — the water control layer and the air control layer must be continuous across the roof-to-wall intersection, not just present on each plane independently.
Why that matters: when a roofer installs a membrane and a siding contractor installs cladding without a shared detail, the joint becomes the weakest link. Air leaks carry moisture into cavities, and moisture condensing behind siding or at the top of wall cavities produces rot far faster than visible exterior damage suggests.
What continuity looks like in practice
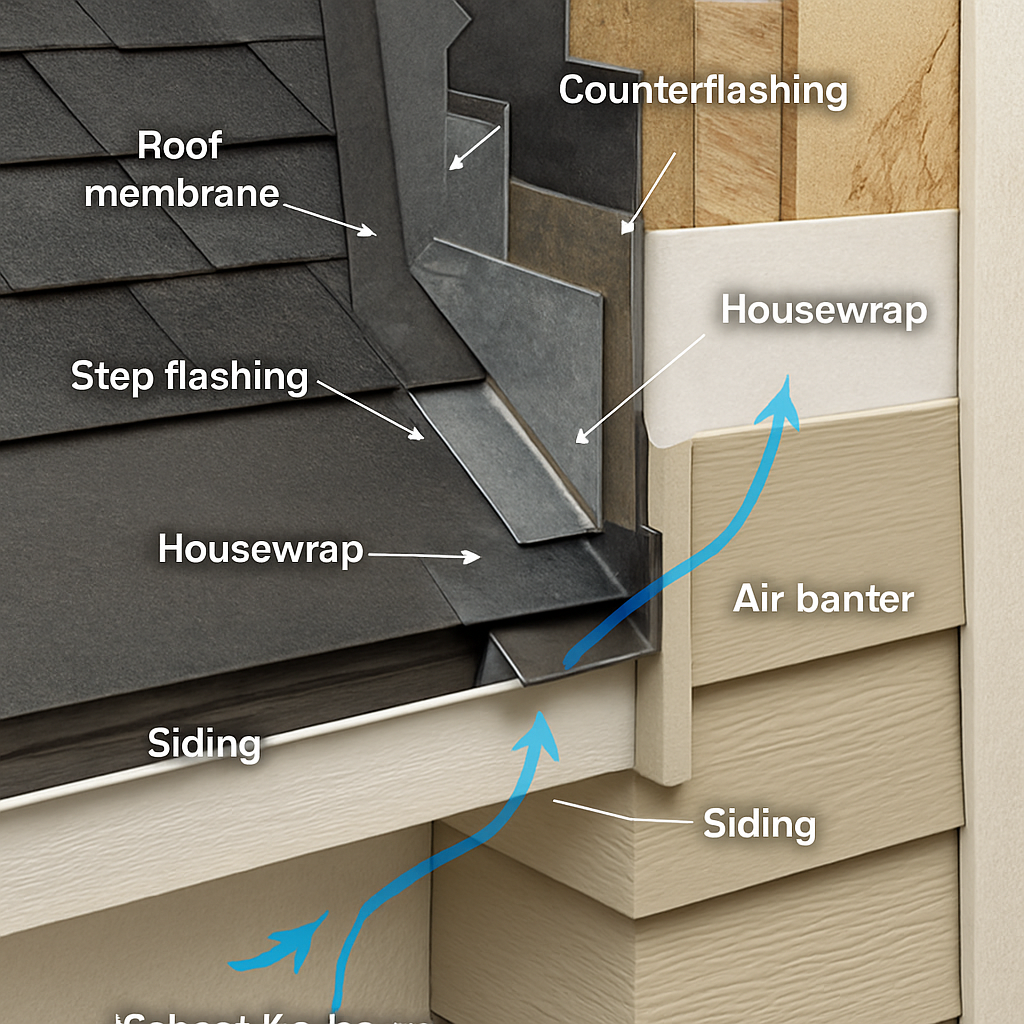
Visualize the stack: from exterior to interior you want siding, an outer drainage plane, a durable water control layer (self-adhered membrane or housewrap), sheathing, and a defined air barrier. At the roof-to-wall junction that stack needs step flashing, counterflashing, and a kickout flashing where the roof discharges to the wall gutter — all tied into the same water-control surface so water bypass cannot occur.
- Practical insight: sequencing is decisive — repair or replace roof flashings before reinstalling siding so the continuous water control layer remains intact.
- Trade-off: adding exterior insulation or thick insulated siding improves thermal performance but forces rework of step and headwall flashings; skip the flashing redesign and you create a new failure mode.
- Inspection trigger: elevated relative humidity in wall cavities or repeated staining at ceilings implies a disrupted air control layer even if exterior siding looks sound.
Concrete example: during a James Hardie siding replacement on a 1970s duplex, contractors removed the cladding and discovered missing kickout flashing where a small roof-to-wall step had drained into the wall cavity for years. The subsequent scope expanded to include localized roof deck replacement and a self-adhered membrane under the new siding — the siding service alone would not have stopped recurring interior damage.
Judgment: contractors and owners overvalue surface fixes. Caulking or relying on siding overlap is a temporary measure; durable performance comes from continuous membranes, correctly installed flashings, and a tested handoff between roofing and siding scopes. In my experience, specifying mockups and a hose test on critical intersections prevents 80 percent of rework.
If budgets force a choice, shore up the continuity at the junction first — a small flashing repair can stop large interior losses far cheaper than a full re-side or roof replacement done in isolation.
Next consideration: commission a single conditional assessment that inspects both siding service and roof waterproofing together—see inspection protocols in Building Science and coordinate follow-up work with a roofing specialist via roof waterproofing.
What a professional siding service covers and its impact on water management
Direct point: a comprehensive siding service is not just about replacing boards or panels — it is the contractor-level work that restores the wall face while re-establishing the drainage plane, air barrier, and proper flashings that keep water out of the assembly.
Scope and deliverables you should require
What to expect: a competent siding service inspects and documents substrate condition, removes and replaces damaged sheathing, installs or repairs housewrap or self-adhered membranes, resets or upgrades window and door flashings, fits kickout and step flashings at roof intersections, evaluates fastener patterns, refreshes sealants, and performs final drainage/verifications.
Practical insight: require that the work order ties the siding installer to a specific water-control continuity outcome — a photographed mockup and a targeted hose test stop the usual blame-shift between siding and roofing crews.
Material failure modes and what they mean for water management
Material reality: different claddings behave differently in wet conditions — CertainTeed or Alside vinyl will tolerate surface wetting but hides defects behind the panels; James Hardie fiber cement resists moisture at the face but fails if sheathing is wet for long periods; metal sidings resist decay but can corrode at fastener points if ventilation and clearances are wrong.
Trade-off to watch: choosing thicker insulated siding or adding continuous exterior insulation improves thermal performance but changes wall thickness and the plane where flashings terminate. If you do not redesign and reinstall step and headwall flashings to match the new plane, you introduce a new leak path.
Real-world case: during a retrofit on a two-story commercial storefront using fiber cement panels, the siding crew removed cladding and found the original headwall counterflashing terminated over a thin strip of failing housewrap. Replacing the sheathing and installing a self-adhered membrane tied into a new counterflashing fixed recurring staining in the retail space above; a simple re-side without addressing the membrane would have left the leak unresolved.
Judgment: in practice, many siding contractors excel at appearance and panel fit but underprice the water-control scope. Insist on certified siding technicians or contractors who document the membrane-to-flashing handoff and list manufacturer-approved details — otherwise you pay for cosmetic work and later for interior repairs.
What roof waterproofing includes and how it reduces water risk
Straight talk: roof waterproofing is the continuous defense that turns rainfall into managed runoff. When the roof surface, flashings, terminations, and drainage work as a single system, water stays outside; when any link fails the building interior becomes vulnerable within hours on a heavy storm.
Common systems and what they actually protect
Low-slope commercial roofs rely on single-ply membranes such as TPO, PVC, or EPDM from manufacturers like Firestone or Carlisle. Steep-slope buildings typically use asphalt shingles with step and counterflashing at walls – think GAF or Owens Corning. Liquid-applied coatings from Sherwin-Williams or Henry are useful for extending service life on sound substrates but are not a fix for failed flashings or ponding water. Metal roofs need seam sealing and screw-point attention to avoid leakage at fasteners and transitions.
- Key waterproofing components: substrate preparation and repairs
- Membrane or coating selection: correct product for slope and exposure
- Flashing and termination details: step flashing, headwall, base flashings, and termination bars
- Drainage integration: gutters, scuppers, downspouts, and slope correction
- Maintenance items: seam inspections, sealant refresh, and removal of debris that causes ponding
Practical tradeoff: coatings are cost effective for roofs that are structurally sound and drain well – they reduce short term risk and ease maintenance. They are not appropriate where membrane seams, flashing terminations, or drainage are compromised; applying a coating over those conditions delays the real repair and creates warranty exposure.
| Leak symptom | Most likely failure point |
|---|---|
| Localized leak along an interior wall-ceiling junction | Failed step flashing or missing counterflashing at the roof-to-wall junction |
| Widespread ceiling staining across a flat roof | Membrane seam failure or puncture in single-ply system |
| Water pooling near parapet or low spot | Insufficient slope, blocked scupper, or degraded substrate causing ponding |
| Intermittent leaks after heavy rain only | Clogged gutters or missing kickout flashing redirecting runoff into wall |
Concrete example: a small office building developed chronic staining near exterior walls after storms. The contractor first applied a coating – no effect. A follow-up inspection found a deteriorated TPO seam at the parapet and a missing termination bar at the headwall. Replacing the seam and reinstalling the termination, then applying a coating for UV protection, eliminated the leaks. The lesson – membrane repairs must precede or accompany surface treatments.
Judgment call for decision makers: prioritize fixing flashing and drainage defects over cosmetic surface work. In my experience, a correctly detailed seam or termination replacement reduces rework and interior damage risk far more than a surface-only coating. Require substrate verification and photographed terminations before accepting any coating contract.
Next consideration – before approving any waterproofing budget, require a combined roof-to-wall detail inspection so flashings are validated and the selected system matches real substrate conditions. This avoids paying twice for surface work that cannot fix underlying terminations.
Critical intersections where siding service and roof waterproofing must be coordinated
Direct point: the roof-to-wall junction is a single performance boundary that frequently gets split between two contractors — when that split is unmanaged, small errors become rapid interior failures.
At these intersections you are not buying two separate fixes; you are buying one continuous water-control outcome. That means the scope, sequence, and acceptance criteria must be defined so flashings, membranes, and cladding terminate to the same plane and the same water-control surface.
Practical sequencing and common failure modes
Sequencing rule of thumb: complete all work that establishes the continuous membrane or termination profile before the cladding is closed. In practice this means the roof membrane and termination bar should be installed and documented, then the siding crew ties their housewrap or self-adhered membrane into that termination.
Real limitation to plan for: scheduling gaps. If siding work exposes sheathing while roof waterproofing awaits a permit or crew, the assembly is at risk during storms. Short-term temporary measures such as taped housewrap or tarp are common but frequently under-specified; they reduce short-term exposure but are not a substitute for a finished termination.
Concrete example: on a three-unit renovation the siding installer removed lower-level cladding and returned control of the wall face to the client, expecting the roofing crew to follow. The roof crew was delayed four weeks; a series of storms soaked the exposed sheathing. The result was a localized deck splice, replacement of 150 square feet of sheathing, and a 30 percent increase in the siding bill because previously hidden rot had to be cut out. Coordinating the trades with a short pre-construction window would have avoided that cost.
Judgment: most persistent leaks at roof-wall joints are contract and coordination failures, not product failures. Insisting on photographed handoffs, a short-circuit water test, and clear stop-work authority prevents the majority of rework and liability arguments.
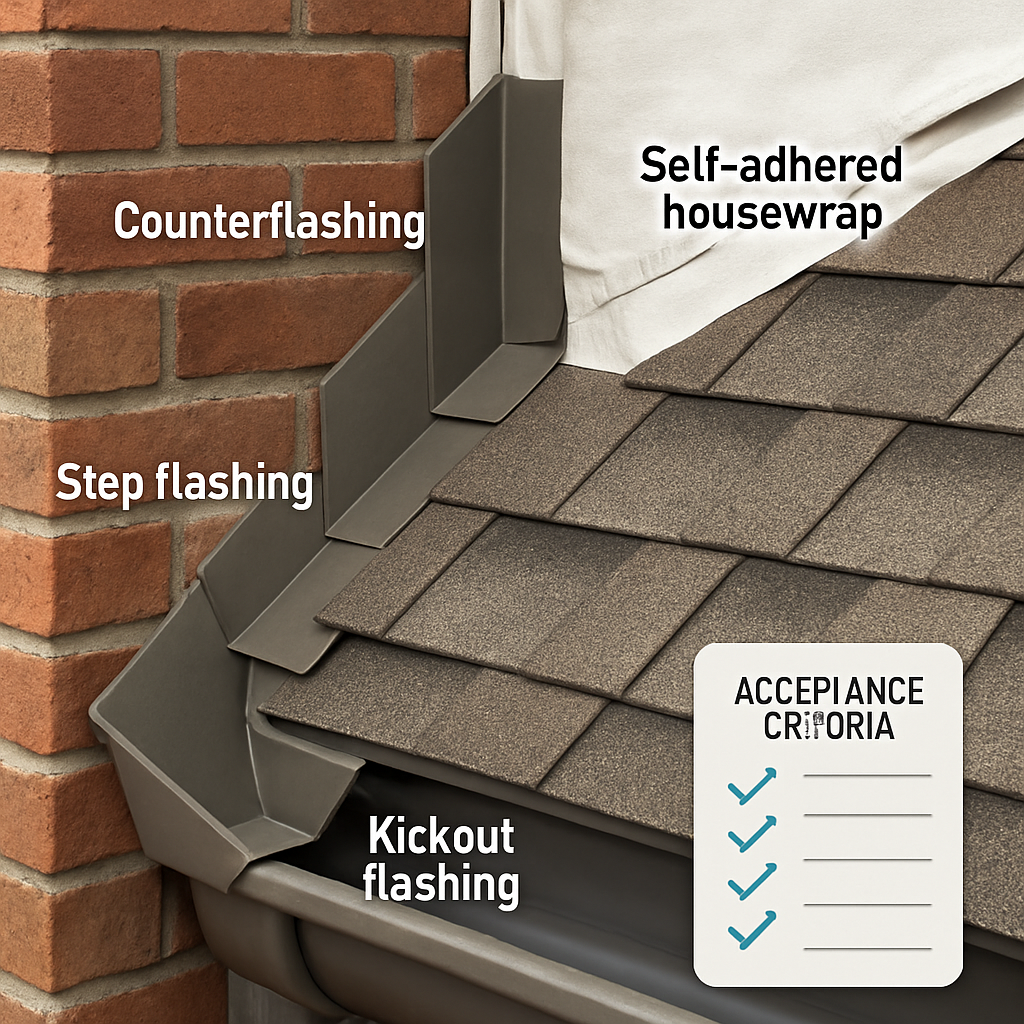
Eight must-have flashing details to inspect (acceptance criteria included)
- Step flashing: each course of roofing must be lapped into flashing and show fasteners or seal per manufacturer; no single continuous vertical leg left uncovered.
- Counterflashing: visible termination secured into a substrate or mortar joint with corrosion-resistant fasteners and continuous sealant where required.
- Kickout flashing: present where roof runoff meets a vertical wall; directs water into the gutter and shows at least 1 inch of positive diversion.
- Headwall termination: termination bar or curb flashing secured and tied into wall membrane with self-adhered strip or compatible sealant.
- Base flashing at parapets: membrane turned up and secured with a termination bar; check for backer rod and sealant at top edge.
- Through-wall flashing and weep details: continuous flashing at offsets with weep holes or drainable plane visible at the cladding reveal.
- Penetration flashings: vents, pipes, and skylights have boots or saddles compatible with the membrane; no ad-hoc mastic-only repairs.
- Fastener and corrosion checks: fasteners through flashings or termination bars are stainless or hot-dipped galvanized and show no evidence of migration or rust staining.
Enforcement tip: require the contractor to log a photographic sequence: substrate, membrane/termination installed, cladding tied in, and final hose-test result. Make final payment contingent on those records and the mockup acceptance.
Critical: treat the roof-wall handoff as a single deliverable with testable acceptance criteria rather than two separate scopes.
Next consideration: schedule a joint pre-construction mockup and make it the contractual gate for closing the wall; that single action eliminates the majority of disputes and prevents most avoidable interior damage.
Comparing costs, lifecycle, and risk reduction for siding service versus roof waterproofing
Start with risk, not appearance. When budgets are limited, the correct first question is which failure will cause the fastest and most costly interior damage, not which upgrade looks nicer. Roof failures typically produce rapid interior exposure and business interruption; siding failures often hide slow-moving moisture that ruins sheathing and insulation over years.
Below are practical installed-cost ranges and a simple 25-year lifecycle comparison you can use for rough budgeting. Numbers are ballpark; get site-specific quotes and require substrate verification before accepting a surface-only solution.
| Component | Installed cost per sq ft (typical) | Expected service life (years) | Approx. 25-year lifecycle cost per sq ft |
|---|---|---|---|
| Vinyl siding services (repair/partial re-side, CertainTeed/Alside) | $3.00 – $6.00 | 20 – 30 | $6.00 – $7.50 |
| Fiber cement re-side (James Hardie) | $7.50 – $12.00 | 30 – 40 | $7.50 – $10.00 |
| Aluminum/metal siding (commercial-grade) | $8.00 – $14.00 | 35 – 50 | $7.00 – $10.00 |
| Asphalt shingle replacement (GAF/Owens Corning) | $3.50 – $6.50 | 20 – 30 | $6.00 – $8.00 |
| Single-ply membrane replacement (TPO/PVC/EPDM, Firestone/Carlisle) | $6.00 – $12.00 | 20 – 30 | $8.00 – $12.00 |
| Liquid-applied roof coating (Sherwin-Williams/Henry) — recoat cycle | $1.50 – $4.00 | 5 – 12 (recoat) | $6.00 – $10.00 |
Practical trade-off: lower installed cost on vinyl or a coating can look attractive, but those lower prices come with narrower failure tolerances. Vinyl masks failing substrates; coatings require a sound flashing base to be effective. Spending more up-front on a robust membrane or fiber cement cladding often lowers total risk-adjusted cost if it prevents interior repairs and mold remediation.
How to prioritize work across a mixed portfolio
- Immediate leak or active interior damage: prioritize roof waterproofing or flashing repair first because these create the highest short-term exposure and insurance claims.
- No active leaks but aged materials: choose the system with the highest expected time-to-failure and lowest cost-to-failure escalation; for example, replace failing roof membranes on properties with frequent storms before cosmetic siding upgrades.
- High-value or occupied assets: favor interventions that minimize disruption and liability. A targeted flashing repair plus a limited re-side at the junction is usually better than a full re-side that leaves uncertain roof terminations.
- Budget-constrained portfolios: schedule short inspections and tactical fixes (kickout flashing, localized sheathing replacement, seam repairs) that close the biggest leak paths first and defer full replacement until a planned capital cycle.
Concrete example: On a single-story retail strip with recurring interior staining after storms, the owner first budgeted a full vinyl re-side. A combined assessment revealed failed TPO seams at parapets and missing kickout flashings. Repairing seams, installing termination bars, and adding kickouts stopped the leaks; the re-side was deferred and downlisted to planned capital replacement two years later.
Judgment: the highest return on limited maintenance dollars is usually a correctly executed repair at the interface — step flashing, termination bars, and clean drainage. Cosmetic or full-system replacements only pay when a single intervention cannot restore the continuous water-control path. Always require photographed substrate condition, manufacturer-compatible details, and warranty transferability from GAF, Carlisle, or James Hardie as applicable; see our roof waterproofing and roof rejuvenation guidance for scope language: roof waterproofing and roof rejuvenation.
Actionable inspection schedule and maintenance checklist for building owners and facility managers
Straight to it: inspections succeed when they are short, repeatable, and tied to a clear risk score. Allocate routine visual checks to your facilities team, reserve annual invasive checks for a qualified siding service and roof waterproofing contractor, and budget a combined, documented reassessment every five years.
Quick schedule you can adopt immediately
- Quarterly visual walk (30–60 minutes): check gutters and downspouts for blockages, look for obvious panel separation or loose trim, clear leaves and debris from roof edges, and scan for new staining at ceilings or soffits.
- After-major-storm check (as-needed within 48 hours): inspect roof flashings, visible siding terminations, and attic for new water entry; document photos and moisture readings if anything looks abnormal.
- Annual technical inspection (2–4 hours): have a certified siding technician and a roof waterproofing specialist perform fastener checks, sealant condition survey,
moisture meterreadings at suspect sheathing spots, and a parapet/scupper functionality test; record findings in the asset log. - Five-year combined condition assessment: engage a third-party assessor or qualified contractor to do a full roof-to-wall detail survey, thermal imaging, representative core removal where needed, and a signed remediation priority list tied to cost estimates and expected service lives.
Practical trade-off: frequent visual checks catch debris and obvious failures cheaply; only invasive annual or five-year checks find hidden rot, undermined flashings, or insulation saturation. Budget accordingly: more frequent eyes on the property reduce emergency repairs but never replace periodic technical verification.
Printable maintenance checklist (copy into work orders)
- Gutters and drains: clear obstructions, verify slope, record downspout discharge point and photo evidence.
- Roof edges and flashings: photograph each roof-to-wall junction, note missing kickouts or loose counterflashing, and attach one close-up per junction.
- Siding panels and fasteners: look for panel gaps, check for loose screws/nail pops (note location and count), and mark any soft spots for moisture testing.
- Sealants and transitions: note type and age of sealant at windows, doors, and terminations; if older than 8 years schedule replacement.
- Moisture verification: take
moisture meterreadings at any suspect sheathing; if reading > 18% mark as immediate action and require contractor remediation. - Documentation: upload timestamped photos (min 3 angles per issue), a short description, and a risk score (0 none, 1 low, 2 medium, 3 urgent).
Pasteable work-order language: Perform annual roof-wall inspection: provide photographed record of each roof-to-wall junction, three moisture meter readings per elevation, sealant type/age log, and remediation estimate for any item scored 2 or 3. Include contractor sign-off and timestamped photos in the final report.
Concrete example: a small apartment building added the quarterly walk to their preventive program. In month two the facilities tech found a cracked kickout flashing and a visible gutter drip line; a targeted contractor visit replaced the kickout and resealed two seams. The quick fix avoided localized sheathing replacement and tenant disruption later in the year.
Key judgement: visual schedules are cost-effective but do not prove the water-control layer. Require moisture readings and photographed terminations before closing any cladding work or accepting waterproofing coatings.
Real world examples and recommended next steps
Direct observation: when one trade fixes appearance without addressing the water-control continuity the same problem returns — and usually at greater cost. The two short examples below show why a combined inspection and a tightly sequenced contract are the cheapest insurance you can buy.
Case 1 — Residential re-side that exposed a hidden failure
Concrete example: A homeowner contracted a James Hardie siding replacement. During removal the siding crew found sheathing delamination behind a missing kickout flashing where a small shed roof met the wall. The scope expanded to localized roof deck replacement, installation of a self-adhered wall membrane, correct step and kickout flashings, and reinstallation of the fiber cement panels. Result: interior staining stopped and a costly mold remediation was avoided.
Case 2 — Commercial flat roof where membrane work was skipped
Concrete example: A small office had recurring wall leaks after storms. A contractor applied a liquid roof coating to the parapet but did not repair compromised TPO seams or replace missing termination bars at headwalls. Leaks persisted. The owner later funded seam replacement, new termination bars, and correctly detailed counterflashings before recoating. The combined repair eliminated the leaks and extended the membrane life; the interim coating purchase was a sunk cost.
Practical trade-off: quick surface work (coatings, cosmetic re-siding) buys time but not resilience. If your assessment shows failed terminations, treating the roof or siding alone is usually a stopgap that raises lifecycle cost. Spend on continuity where it intersects with high exposure — parapets, headwalls, and shed-roof junctions.
Five-step action plan to use in the next 90 days
- 1) Commission a combined condition assessment: hire a firm that inspects both roofing membranes and wall claddings in one visit; require photos, moisture meter logs, and annotated sketches of roof-to-wall junctions. See Expert Roofing waterproofing for scope examples.
- 2) Identify immediate mitigations: if any junctions expose sheathing or lack positive drainage, require temporary but specified protections (self-adhered strips, taped housewrap, or tarping) with an exact calendar for permanent work.
- 3) Require a demonstration mockup at critical junctions: bidders must produce a photographed mockup and perform a short-duration infiltration check (documented, time-stamped) before closing the wall.
- 4) Collect three coordinated proposals: specify that bids include compatible materials (name manufacturer/model), a sequencing plan showing which trade does which step, and warranty transfer language tied to those manufacturers.
- 5) Hold back final payment until verification: include a 10% holdback or 30-day observation tied to moisture readings below 16–18% and signed acceptance of photographed terminations.
Final consideration: prioritize verification over assumptions. Require documented evidence of continuity and a short observation window after work completes; that discipline prevents the most common cost escalations and allocates limited capital to fixes that actually stop water intrusion.